Stamping Technique: Marker Coloring
Remember the marker chart from last week that showed you how to create our exclusive colors by blending ShinHan™ Touch Twin™ markers? Well, today we’re going to show you beautiful artwork that uses these formulas to fill in stamps! AND we’re going to teach you some tricks for how to do this!
Using this month’s featured paper packets, Zoe and Nevermore, our artist made these 3 adorable autumn cards:
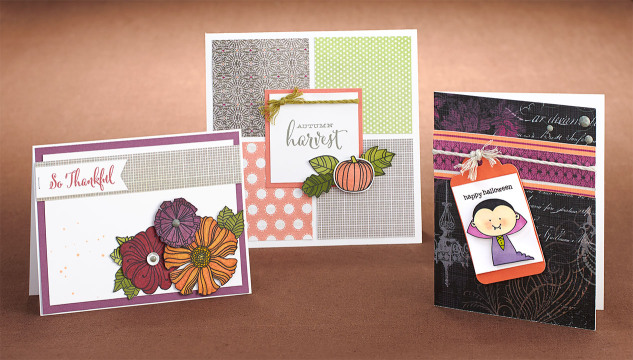
Aren’t they cute? Using the ShinHan™ Touch Twin™ markers to fill in stamped images is a great way to add rich, vibrant color to your artwork. Before we dive in to the specific techniques used in these cards, let’s talk about ink and paper. When filling in a stamped image with these alcohol-based markers, the ink you use to stamp your image really matters. If you stamp with a water-based ink, your image will most likely bleed and become less distinct as you color over it with the markers. We recommend using our Archival Black Exclusive Inks™ pad or other inks like the Black StazOn™ ink pad or the Tuxedo Black Memento™ ink pad.
Whatever ink you use, be sure that your ink dries completely before you use the markers. On this artwork, our artist used a craft heater to make sure the stamped images were completely dry before she grabbed her markers. We also recommend using White Daisy cardstock when blending the markers to create our exclusive colors.
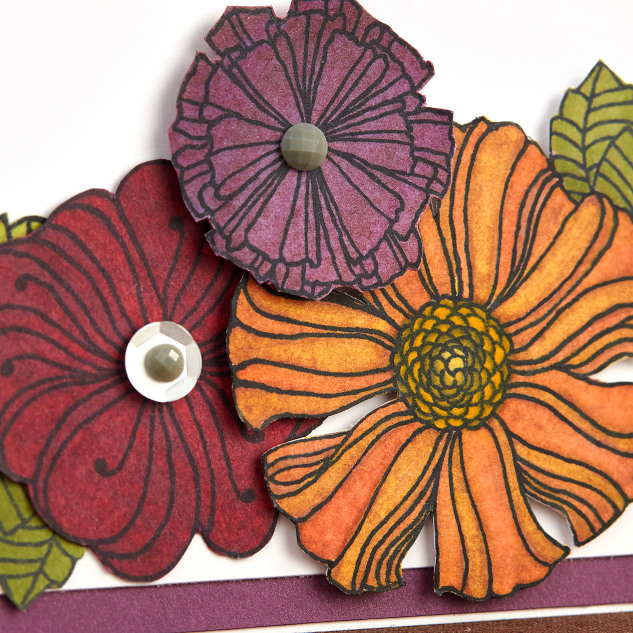
After stamping (and drying!) the outline of these blossoms, our artist followed the marker chart to create Pomegranate, Eggplant, Sunset, and Saffron petals. As you’ll remember from our previous post, the order of the layered colors is very important, so make sure to follow the marker chart. We love how she alternated Saffron and Sunset on the largest flower! With the help of the chart, she also created Fern and Sweet Leaf leaves. Notice how the Eggplant cardstock on the base of the card matches the Eggplant blossom and pulls the card together.

On this card, our artist used a really cool technique to get the shading on the leaf. She began by following the instructions for creating Sweet Leaf: First she colored the stamp with the Sap Green marker and then with the Pastel Green marker. To create Sweet Leaf you have to repeat these steps, so she colored it again with Sap Green, but then only colored half of the leaf with the Pastel Green, creating that ombré effect. How cool is that?

For the final card, our artist dressed this little monster up in Gypsy, Thistle, and Pear, created again by blending our markers. And don’t you just love those rosy cheeks? After coloring the face using the Barley Beige marker, the artist used the fine tip of the Light Orange marker to lightly add a few dots close together in a circle shape. She then immediately colored over the cheek a few times with Barley Beige large tip to blend the cheek in. The result—a very cute, blushing vampire.
And there you have it! A few tricks you can use when filling in your stamps with the ShinHan™Touch Twin™ markers. To see more artwork made using our Nevermore and Zoe paper collections, search for the hashtags #ctmhzoe and #ctmhnevermore on Facebook and Instagram. And stay tuned here on the blog for more artwork featuring great stamping techniques throughout the month!
Recipes
4 ½” x 5 ½” So Thankful Card
Originals: A Heartfelt Classic™
D1662 My Acrylix® Harvest Wreath, D1651 My Acrylix® Wavy Blooms, X7197B Zoe Paper Packet, X5774 Eggplant Cardstock, 1385 White Daisy Cardstock, Z2170 Ruby Exclusive Inks™ Pad, Z888 Black StazOn™ Ink Pad, Z3089 Grey Enamel Gems, Z2013 Sequins Silver Assortment, Z2456 ShinHan™Touch Twin™ Mahogany Marker, Z2452 ShinHan™ Touch Twin™ Golden Yellow Marker, Z2455 ShinHan™ Touch Twin™ Light Orange Marker, Z2467 ShinHan™ Touch Twin™ Warm Grey 4 Marker, Z2453 ShinHan™ Touch Twin™ Lavender Marker, Z2448 ShinHan™ Touch Twin™ Carmine Marker, Z2447 ShinHan™ Touch Twin™ Bronze Marker, Z2450 ShinHan™ Touch Twin™ Cherry Pink Marker, Z2463 ShinHan™ Touch Twin™ Sap Green Marker, Z2462 ShinHan™ Touch Twin™ Peony Purple Marker, Z2459 ShinHan™ Touch Twin™ Pastel Green Marker, Z2454 ShinHan™ Touch Twin™Leaf Green Marker, Z3132 Watercolor Paints, Z2027 Mini Stapler
6″ x 6″ Autumn Harvest Card
Originals: Background Blocks™
B1463 My Acrylix® Thankful Heart, D1662 My Acrylix® Harvest Wreath, X7197B Zoe Paper Packet, X7198B Nevermore Paper Packet, X5751 Sorbet Cardstock, 1385 White Daisy Cardstock, Z2173 Slate Exclusive Inks™ Pad, Z888 Black StazOn™ Ink Pad, Z3093 Fern Thick Twine, Z2463 ShinHan™ Touch Twin™ Sap Green Marker, Z2459 ShinHan™ Touch Twin Pastel Green Marker, Z2467 ShinHan™Touch Twin™ Warm Grey 4 Marker, Z2451 ShinHan™ Touch Twin™ Clay Marker, Z2455 ShinHan™Touch Twin™ Light Orange Marker, Z1151 3-D Foam Tape
5 ½” x 4 ½” Happy Halloween
Wishes: Pattern Designer Tag™
C1630 My Acrylix® Little Monsters, X7198B Nevermore Paper Packet, X5758 Sunset Cardstock, 1385 White Daisy Cardstock, Z2105 Black Exclusive Inks™ Pad, Z888 Black StazOn™ Ink Pad, Z3095 Whisper Thick Twine, Z3089 Grey Enamel Gems, Z2446 ShinHan™ Touch Twin™ Black Marker, Z2445 ShinHan™ Touch Twin™ Barley Beige Marker, Z2454 ShinHan™ Touch Twin™ Leaf Green Marker, Z2467 ShinHan™ Touch Twin™ Warm Grey 4 Marker, Z2453 ShinHan™ Touch Twin™Lavender Marker, Z2462 ShinHan™ Touch Twin™ Peony Purple Marker, Z2455 ShinHan™ Touch Twin™ Light Orange Marker, Z1151 3-D Foam Tape, Z3171 Cricut® Art Philosophy Collection
Cricut® Shape:
Art Philosophy
3 ½” <tag 3> (p. 50)
Art Philosophy
3 ½” <tag 3> (p. 50)
You can find all the supplies needed to complete this project on my website here
No comments:
Post a Comment